Week 3 [Fri, Aug 20th] - Topics
Guidance for the item(s) below:
Let's learn about a few more Git techniques, starting with branching. Although these techniques are not really needed for the iP, we force you to use them in the iP so that you have more time to practice them before they are really needed in the tP.
Can explain branching
Branching is the process of evolving multiple versions of the software in parallel. For example, one team member can create a new branch and add an experimental feature to it while the rest of the team keeps working on another branch. Branches can be given names e.g. master, release, dev.
A branch can be merged into another branch. Merging usually results in a new commit that represents the changes done in the branch being merged.
 Branching and merging
 Merge conflicts happen when you try to merge two branches that had changed the same part of the code and the RCS cannot decide which changes to keep. In those cases, you have to ‘resolve’ the conflicts manually.
Can use Git branching
Git supports branching, which allows you to do multiple parallel changes to the content of a repository.
A Git branch is simply a named label pointing to a commit. The HEAD label indicates which branch you are on. Git creates a branch named master by default. When you add a commit, it goes into the branch you are currently on, and the branch label (together with the HEAD label) moves to the new commit.
Given below is an illustration of how branch labels move as branches evolve.

- There is only one branch (i.e.,
master) and there is only one commit on it. - A new commit has been added. The
masterand theHEADlabels have moved to the new commit. - A new branch
fix1has been added. The repo has switched to the new branch too (hence, theHEADlabel is attached to thefix1branch). - A new commit (
c) has been added. The current branch labelfix1moves to the new commit, together with theHEADlabel. - The repo has switched back to the
masterbranch.
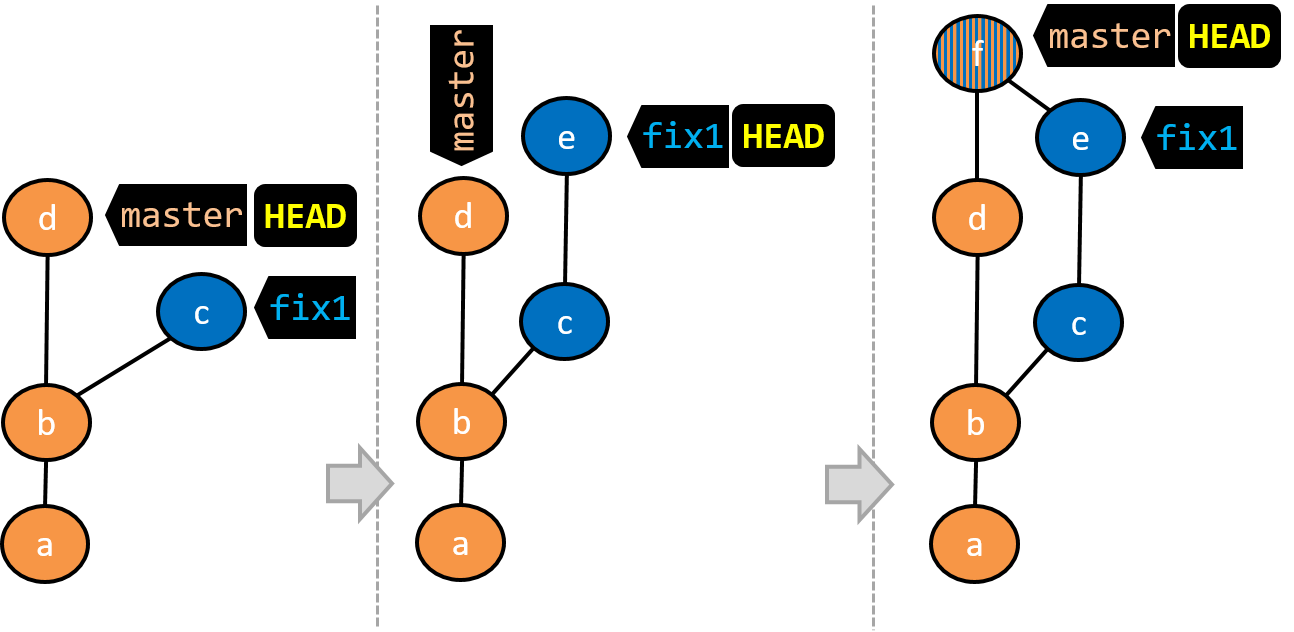
- A new commit (
d) has been added. Themasterlabel has moved to that commit. - The repo has switched back to the
fix1branch and added a new commit (e) to it. - The repo has switched to the
masterbranch and thefix1branch has been merged into themasterbranch, creating a merge commitf. The repo is currently on themasterbranch.
Follow the steps below to learn how to work with branches. You can use any repo you have on your computer (e.g. a clone of the samplerepo-things) for this.
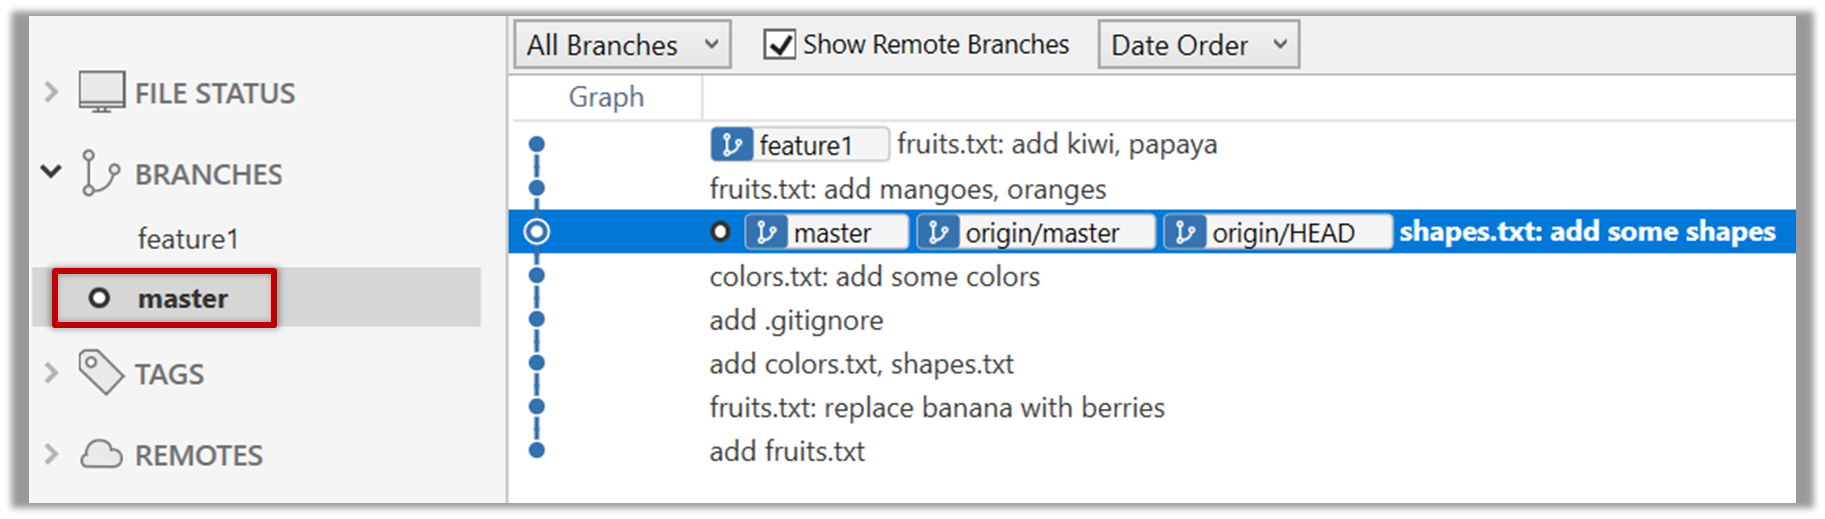
0. Observe that you are normally in the branch called master.

git status
on branch master
1. Start a branch named feature1 and switch to the new branch.
Click on the Branch button on the main menu. In the next dialog, enter the branch name and click Create Branch.
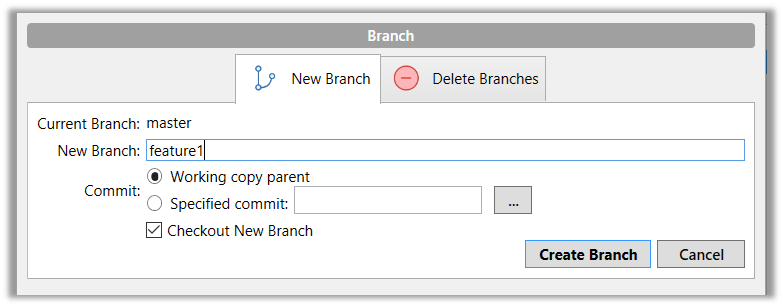
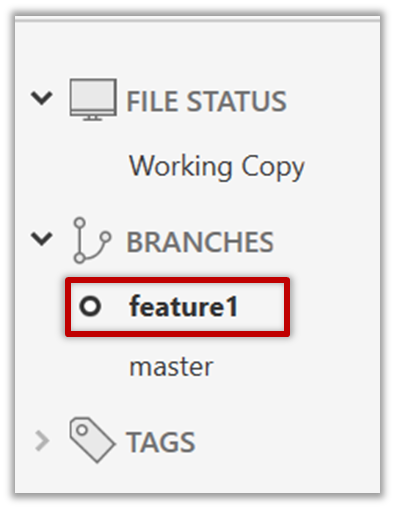
Note how the feature1 is indicated as the current branch.
You can use the branch command to create a new branch and the checkout command to switch to a specific branch.
git branch feature1
git checkout feature1
One-step shortcut to create a branch and switch to it at the same time:
git checkout –b feature1
2. Create some commits in the new branch. Just commit as per normal. Commits you add while on a certain branch will become part of that branch.
Note how the master label and the HEAD label moves to the new commit (The HEAD label of the local repo is represented as in SourceTree).
3. Switch to the master branch. Note how the changes you did in the feature1 branch are no longer in the working directory.
Double-click the master branch.
git checkout master
4. Add a commit to the master branch. Let’s imagine it’s a bug fix.
To keep things simple for the time being, this commit should not involve the same content that you changed in the feature1 branch. To be on the safe side, this commit can change an entirely different file.
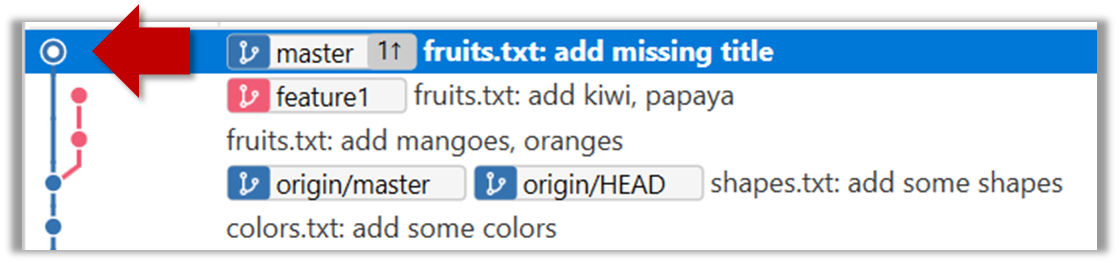
5. Switch back to the feature1 branch (similar to step 3).
6. Merge the master branch to the feature1 branch, giving an end-result like the following. Also note how Git has created a merge commit.

Right-click on the master branch and choose merge master into the current branch. Click OK in the next dialog.
git merge master
The objective of that merge was to sync the feature1 branch with the master branch. Observe how the changes you did in the master branch (i.e. the imaginary bug fix) is now available even when you are in the feature1 branch.
Instead of merging master to feature1, an alternative is to rebase the feature1 branch. However, rebasing is an advanced feature that requires modifying past commits. If you modify past commits that have been pushed to a remote repository, you'll have to force-push the modified commit to the remote repo in order to update the commits in it.
7. Add another commit to the feature1 branch.
8. Switch to the master branch and add one more commit.
9. Merge feature1 to the master branch, giving and end-result like this:
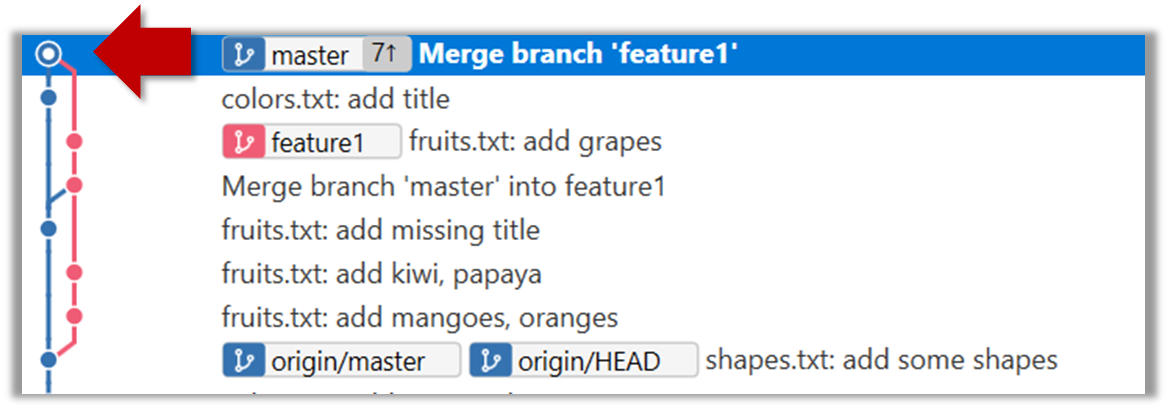
Right-click on the feature1 branch and choose Merge....
git merge feature1
10. Create a new branch called add-countries, switch to it, and add some commits to it (similar to steps 1-2 above). You should have something like this now:
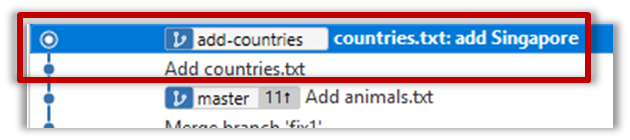
Avoid this common rookie mistake!
Always remember to switch back to the master branch before creating a new branch. If not, your new branch will be created on top of the current branch.
11. Go back to the master branch and merge the add-countries branch onto the master branch (similar to steps 8-9 above). While you might expect to see something like the following,
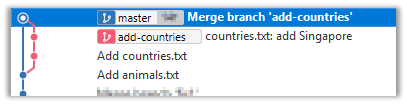
... you are likely to see something like this instead:

That is because Git does a fast forward merge if possible. Seeing that the master branch has not changed since you started the add-countries branch, Git has decided it is simpler to just put the commits of the add-countries branch in front of the master branch, without going into the trouble of creating an extra merge commit.
It is possible to force Git to create a merge commit even if fast forwarding is possible.
Tick the box shown below when you merge a branch:
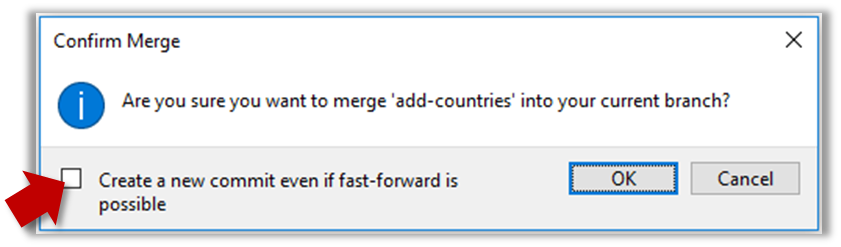
Use the --no-ff switch (short for no fast forward):
git merge --no-ff add-countries
Pushing a branch to a remote repo
Here's how to push a branch to a remote repo:
Here's how to push a branch named add-intro to your own fork of a repo named samplerepo-pr-practice:

Normally: git push {remote repository} {branch}. Examples:
git push origin masterpushes themasterbranch to the repo namedorigin(i.e., the repo you cloned from)git push upstream-repo add-intropushes theadd-introbranch to the repo namedupstream-repo
If pushing a branch you created locally to the remote for the first time, add the -u flag to get the local branch to track the new upstream branch:
e.g., git push -u origin add-intro
See git-scm.com/docs/git-push for details of the push command.
Can use Git to resolve merge conflicts
Merge conflicts happen when you try to combine two incompatible versions (e.g., merging a branch to another but each branch changed the same part of the code in a different way).
Here are the steps to simulate a merge conflict and use it to learn how to resolve merge conflicts.
0. Create an empty repo or clone an existing repo, to be used for this activity.
1. Start a branch named fix1 in the repo. Create a commit that adds a line with some text to one of the files.
2. Switch back to master branch. Create a commit with a conflicting change i.e. it adds a line with some different text in the exact location the previous line was added.
3. Try to merge the fix1 branch onto the master branch. Git will pause mid-way during the merge and report a merge conflict. If you open the conflicted file, you will see something like this:
COLORS
------
blue
<<<<<< HEAD
black
=======
green
>>>>>> fix1
red
white
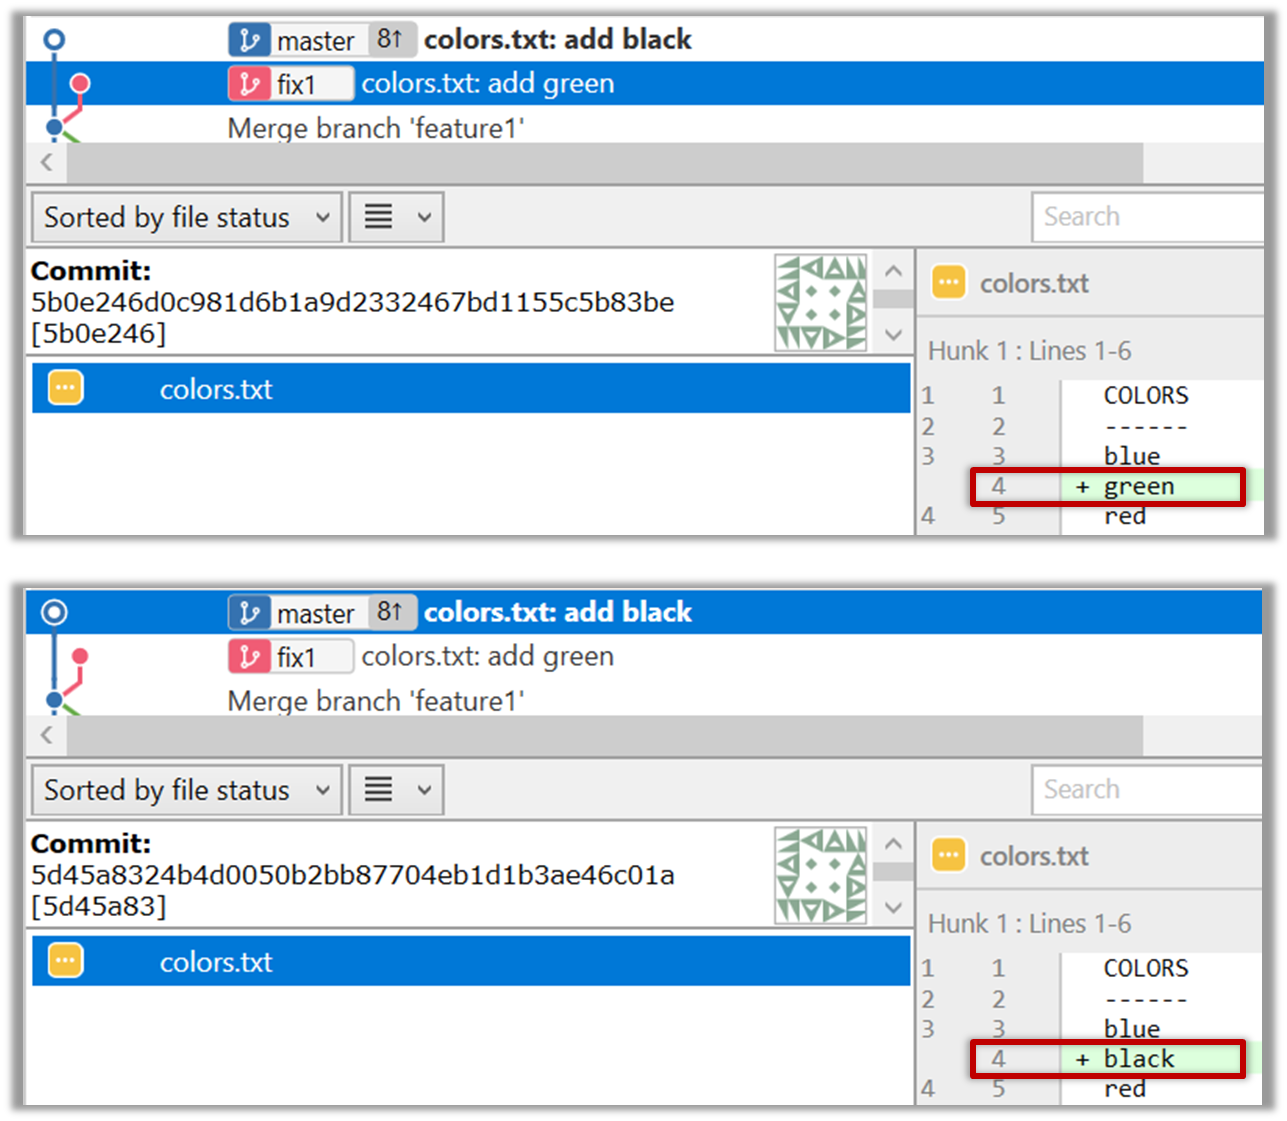
4. Observe how the conflicted part is marked between a line starting with <<<<<< and a line starting with >>>>>>, separated by another line starting with =======.
Highlighted below is the conflicting part that is coming from the master branch:
blue
<<<<<< HEAD
black
=======
green
>>>>>> fix1
red
This is the conflicting part that is coming from the fix1 branch:
blue
<<<<<< HEAD
black
=======
green
>>>>>> fix1
red
5. Resolve the conflict by editing the file. Let us assume you want to keep both lines in the merged version. You can modify the file to be like this:
COLORS
------
blue
black
green
red
white
6. Stage the changes, and commit.
Guidance for the item(s) below:
Let's learn how to create a pull request (PRs) on GitHub; you need to create one for your project this week.
Guidance for the item(s) below:
Let's start by going through some Java topics that is relevant to the iP. You can skim through or skip topics that you are familiar with already.
Can explain JavaDoc
JavaDoc is a tool for generating API documentation in HTML format from comments in the source code. In addition, modern IDEs use JavaDoc comments to generate explanatory tooltips.
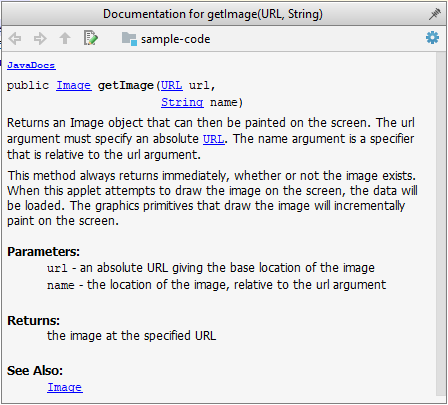
An example method header comment in JavaDoc format (adapted from Oracle's Java documentation)
/**
 * Returns an Image object that can then be painted on the screen.
 * The url argument must specify an absolute {@link URL}. The name
 * argument is a specifier that is relative to the url argument.
 * <p>
 * This method always returns immediately, whether or not the
 * image exists. When this applet attempts to draw the image on
 * the screen, the data will be loaded. The graphics primitives
 * that draw the image will incrementally paint on the screen.
 *
 * @param url an absolute URL giving the base location of the image
 * @param name the location of the image, relative to the url argument
 * @return the image at the specified URL
 * @see Image
 */
public Image getImage(URL url, String name) {
    try {
        return getImage(new URL(url, name));
    } catch (MalformedURLException e) {
        return null;
    }
}
Generated HTML documentation:

Tooltip generated by Intellij IDE:
Guidance for the item(s) below:
As you know, one of the objectives of the iP is to raise the quality of your code. We'll be learning about various ways to improve the code quality in the next few weeks, starting with coding standards.
Guidance for the item(s) below:
As promised last week, let's learn some more sophisticated ways of testing.
Can explain the need for early developer testing
Delaying testing until the full product is complete has a number of disadvantages:
- Locating the cause of a test case failure is difficult due to a large search space; in a large system, the search space could be millions of lines of code, written by hundreds of developers! The failure may also be due to multiple inter-related bugs.
- Fixing a bug found during such testing could result in major rework, especially if the bug originated from the design or during requirements specification i.e. a faulty design or faulty requirements.
- One bug might 'hide' other bugs, which could emerge only after the first bug is fixed.
- The delivery may have to be delayed if too many bugs are found during testing.
Therefore, it is better to do early testing, as hinted by the popular rule of thumb given below, also illustrated by the graph below it.
The earlier a bug is found, the easier and cheaper to have it fixed.
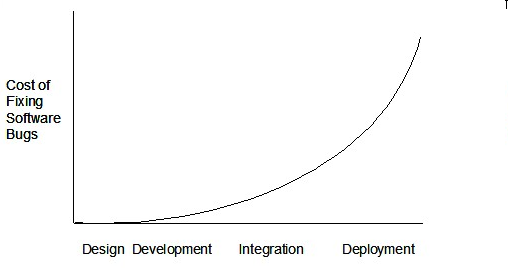
Such early testing of partially developed software is usually, and by necessity, done by the developers themselves i.e. developer testing.
Can explain test automation tools
JUnit is a tool for automated testing of Java programs. Similar tools are available for other languages and for automating different types of testing.
This is an automated test for a Payroll class, written using JUnit libraries.
@Test
public void testTotalSalary() {
    Payroll p = new Payroll();

    // test case 1
    p.setEmployees(new String[]{"E001", "E002"});
    assertEquals(6400, p.totalSalary());

    // test case 2
    p.setEmployees(new String[]{"E001"});
    assertEquals(2300, p.totalSalary());

    // more tests...
}
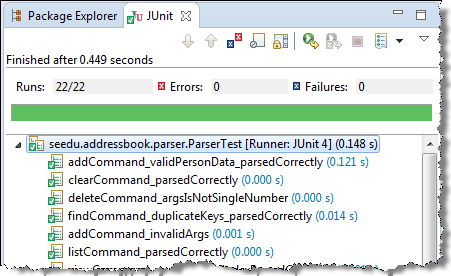
Most modern IDEs have integrated support for testing tools. The figure below shows the JUnit output when running some JUnit tests using the Eclipse IDE.