Week 4 [Fri, Aug 27th] - Project
iP:
- Use GFMD in the PR description
- Review some peer PRs counted for participation
- Learn from others (optional)
- Add Increments as branches:
A-Gradle,A-CheckStyle,Level-10,A-Varargs
tP:
- Start weekly project meetings
- Start a collaborative doc to take project notes before the tutorial
- Decide on an overall project direction (user profile, problem addressed) before the tutorial
iP
1 Use GFMD in the PR description
- GitHub Flavored Markdown (and Markdown in general) is useful in many places when using GitHub e.g., issue tracker, PR reviews, writing documentation. The aim of this task is to ensure that you are sufficiently familiar with the GFMD syntax.
- Requirements: Update click on the the
...icon on the top right corner of the previous description and chooseEdit(how?) the description of the iP PR you created earlier so that it contains the following GFMD elements:- a heading
- a bullet list
- a numbered list
- a fenced code block (with syntax highlighting)
- a task list
- an emoji
- a blockquote
- a hyper link
- inline code
- some text formatting: bold, italic, stikethrough etc.
If you wish, you may write the PR description to be very similar to the example given above -- as the goal here is to demonstrate your mastery of the GFMD syntax (not ad writing skills).
2 Review some peer PRs counted for participation
Please wait till Mon, Aug 30th to start this task, to give others a few extra days to create the PR if they haven't done so yet.
This task is worth 2x2=4 participtaion points.
- Learn how you should review PRs in this task:
Step 1 Note these additional guidelines:
- Read the Best practices for reviewing PRs @SE-EDU/guides. You are expected to follow all of them.
- Make sure you add 'review comments' (not regular comments) as only those are counted for participation. See step 4 in the panel above to find how to add 'review comments'.
- If the PR has received some review comments already, feel free to confirm/complement/question those comments in your review. Also, look for things the previous reviewers may have missed.
- At the end of the review, choose
Comment(i.e., notApproveorRequest changes)
Step 2 Do the first PR review as follows.
- Give comment on coding standard related issues only.
Review comments don't always have to be about problems in the code. Other things you can do:- complement the author on not making a common mistake
- ask questions
- suggest alternatives
- The review allocation is given in the panel below.
- Give comment on coding standard related issues only.
If the student you have been allocated to review has not created a PR (or the PR has a trivial amount of code), you can review the Backup PR to review provided in the allocation table. Failing both, review another PR allocated to another student in your own tutorial but not in your team.
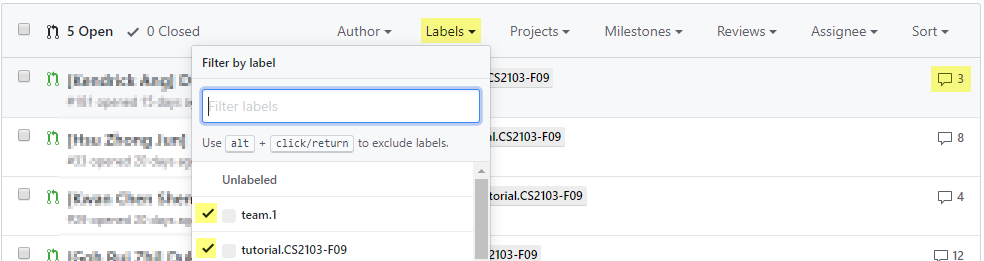
Tip for future reference: GitHub allows you to filter PRs/Issues using various criteria such as author:AuthorUsername (example -- see the filters text box in the target page).
Alternatively, you can use PR labels (if any) to filter PRs/Issues.
FAQ: How many comments should I add? Answer: Depends on the code being reviewed but we expect most PRs would warrant at least 4-5 comments. If the PR is huge, you can stop when you think you've put in a fair amount of time on the job (~15 minutes) and added enough comments for the PR author to receive some value.
- Step 3 Do the second PR review as follows.
- Comment on other code quality guidelines (see the section Naming in this textbook chapter) you have learned so far. It's optional to comment on coding standard violations in this PR review.
- The review allocation is given in the panel below.
If the allocated PR is not suitable, use the same strategy as before to find an alternative PR to review.
- Step 4 [When you receive reviews for your own PR] Respond to comments received. You are recommended to (but not obliged to) respond to comments received from peers, especially if the PR reviewer asked you for more info. As mentioned in these guidelines, do not get into arguments with PR reviewers/authors.
3 Learn from others (optional)
- You can use the iP Code Dashboard to view others' iP code, using the
Links → iP Code Dashboarditem in the top navigation menu. Click on the </> icon corresponding to a student name to see the code written by that person. We encourage you to read others’ code and learn from them. If you adopt solutions from others (also encouraged), please follow our reuse policy.
4 Add Increments as branches: A-Gradle, A-CheckStyle, Level-10, A-Varargs
- Do each enhancement in a separate branch and merge to the
masterbranch only when ready (if you push incomplete features into themasterbranch, it can confuse others reviewing your PR). There is no need to do the increments as parallel branches though i.e., you can do one increment and merge that branch before starting on the next one.
If you have completed any of them in previous weeks, just add the corresponding tag (no need to create a branch).
- Note that you no longer need to keep the text-based UI after adding a GUI. Similarly, there is no need to use the I/O redirection style automated testing anymore (that technique is suited for text UIs only).
tP: Set direction
1 Start weekly project meetings
- We recommend you start weekly project meetings now. You can use the meeting to do tP tasks, but also help each other do iP tasks. On a related note, it is also acceptable to discuss weekly post-lecture quiz (if any) together with team members as you do the quiz i.e., discuss and decide the answer collectively, but you should not give away your answers to someone who was not part of that discussion.
2 Start a collaborative doc to take project notes before the tutorial
- Keep project notes in easy-to-use collaborative docs (Recommended: use a GoogleDoc). This document will be checked by the instructors at various points.
Remember to choose a tool that allow public view access e.g., GoogleDoc can be shared via a public link so that the document can be viewed by others. You'll be asked to submit this link to us in the next week.
Make sure all you current and future project notes (if split into in multiple documents) are reachable via links given in this document and are viewable by the public.
3 Decide on an overall project direction (user profile, problem addressed) before the tutorial
- Decide project direction, target user profile, and problem addressed: Use your first project meeting to discuss with your team members and decide your project direction, target user profile, and the value proposition of the product, as described in the panels below:
As we are still at the early stages of identifying a problem to solve, do not think of the product (i.e., the solution) yet. That is, do not discuss the product features, UI, command format, and implementation details, etc. unless they are pertinent to the decision of the project direction.
- Submission: Submit your product name, target user profile, the value proposition, and the public link to your collaborative project notes via TEAMMATES. You'll receive an email from TEAMMATES with the submission link. Only one member needs to submit on behalf of the team. All members can view/update the submission.
Submission link will be sent to you by Mon, Aug 30th (reason: we need a few days to set up the submission system after teams have been finalized).